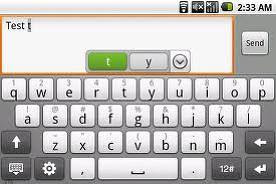
One of the biggest gripes I’m hearing on the Sony Ericsson Xperia X10 relates to keyboard input. People are having problems with letters needing several touches before being recognised as well as inaccurate text entry.
For these problems, we can change the default keyboard that hopefully results in a more harmonious experience. Go to Settings > Locale and Text. Long press in a text box and choose Input Method and then select your keyboard of choice.
However, to get the most out of the X10, it’s worth installing the HTC Touch Input (HTC_IME) keyboard. The keyboard really is a step above the X10 and is well worth the effort to try and install.
Instructions on installing the HTC keyboard on the Xperia X10
1. Firstly you should prepare your X10 for third party software installations:
-Press the MENU key and follow Settings > Applications
-Ensure Unknown Sources is ticked
You will receive a warning when ticking this box and you should of course be careful that you only install software of trusted source
2. Next you should install a file manager which is capable of handling .apk files for installation:
-Download a free file manager from the Android Market such as Astro
Other file managers are available
3. Now you can download the HTC keyboard and transfer it to your SD card:
-Attach your phone to the USB cable and, via the “USB Connected” notification, choose Mount for file transfer
You may need to setup the drivers if you haven’t already installed the Sony Ericsson software
-Alternately you can remove your SD card and access it through a USB reader
-Download the latest highres version of this modded HTC_IME
http://www.hallerud.se/htc_ime_jonasl_hires_25.zip --- High resolution version
http://www.hallerud.se/htc_ime_jonasl_lowres_25.zip --- Low resolution version for Android 1.6 and up
http://www.hallerud.se/htc_ime_jonasl_lowres15_25.zip --- Low resolution version for Android 1.5 (no voice input)
All credit goes to jonasl
-Save the zip file to your computer and extract the files .htcime, HTC_IME.apk & Clicker.apk
-Copy .htcime to your SD root directory
This file contains setup information for the modded keyboard -Copy HTC_IME.apk to your chosen location of the SD card
This file installs the HTC Touch Input keyboard -Copy Clicker.apk to your chosen location of the SD card
This file enables screen calibration and is optional
4. You can now disconnect your X10 from the computer and install the apk’s:
-Select Turn Off USB Storage from the Android notification bar and press Turn Off
-Open the file manager you installed in step 2 and browse to the location you saved the apk files to.
-Click on HTC_IME.apk and select Open App Manager
The options may vary in different file management apps -Press Install to begin the installation or Upgrade if installing over an older version
-Follow the installation process as normal then press Done and return to your file manager
-Click on Clicker.apk if you wish to install the calibration tool and follow as above, skip this step if you do not wish to use the calibration
5. The keyboard is now installed but needs to be activated as an input option:
-Press the HOME key then MENU and follow Settings > Locale & Text
-Ensure Touch Input is ticked
-Now long press any text input box and choose Input Method where you will see the new Touch Input option
-Select this and enjoy vastly improved typing on your Xperia X10
 RSS Feeds
 File Under :

0 comments:
Post a Comment